Here’s a strange truth about learning guitar: chords get all the attention, but strumming is what makes you sound like you can actually play. A student with five chords and solid strumming sounds like a guitarist. A student with twenty chords and shaky strumming sounds like a beginner. The rhythm hand is the one your listeners actually hear.
The good news is that strumming patterns are a much smaller subject than they appear. The internet makes it look like there are hundreds of patterns to memorize. In practice, a handful of patterns — built from one underlying motion — cover the overwhelming majority of songs. This article teaches the motion, the counting system, the five essential patterns, and the fixes for the timing problems every student hits. It assumes you can hold a couple of chords; everything else starts from zero.
The One Motion Behind Every Pattern
Before any patterns: every strumming pattern you will ever play is built on a single underlying motion — your strumming hand moving down and up in a steady, unbroken pendulum. Down-up, down-up, down-up, like a metronome made of wrist. This motion never stops, even when you’re not hitting the strings.
This is the single most important idea in this article, and it’s the one beginners most often miss. A strumming pattern is not a sequence of separate hand movements you assemble. It’s the constant pendulum, with some swings touching the strings and some swings passing over them silently. The down-strums happen on the downswings, the up-strums on the upswings, and the “missing” strums in a pattern are just swings where your hand keeps moving but doesn’t make contact.
Why does this matter so much? Because the pendulum is your timekeeper. If your hand keeps swinging steadily, your rhythm stays locked even when the pattern gets complicated. Students who stop and start their hand for each strum have to consciously time every single hit — which falls apart the moment the pattern has any complexity. Students who keep the pendulum going get the timing for free. Every fix for every strumming problem in this article comes back to this principle.
How to Count: Downbeats and the ‘And’
Strumming patterns are written and counted against a four-beat measure: 1, 2, 3, 4. Your hand swings down on each number. Between each number is the upswing, counted as “and” (written “&”). So a full measure of pendulum motion is counted:
1 & 2 & 3 & 4 &
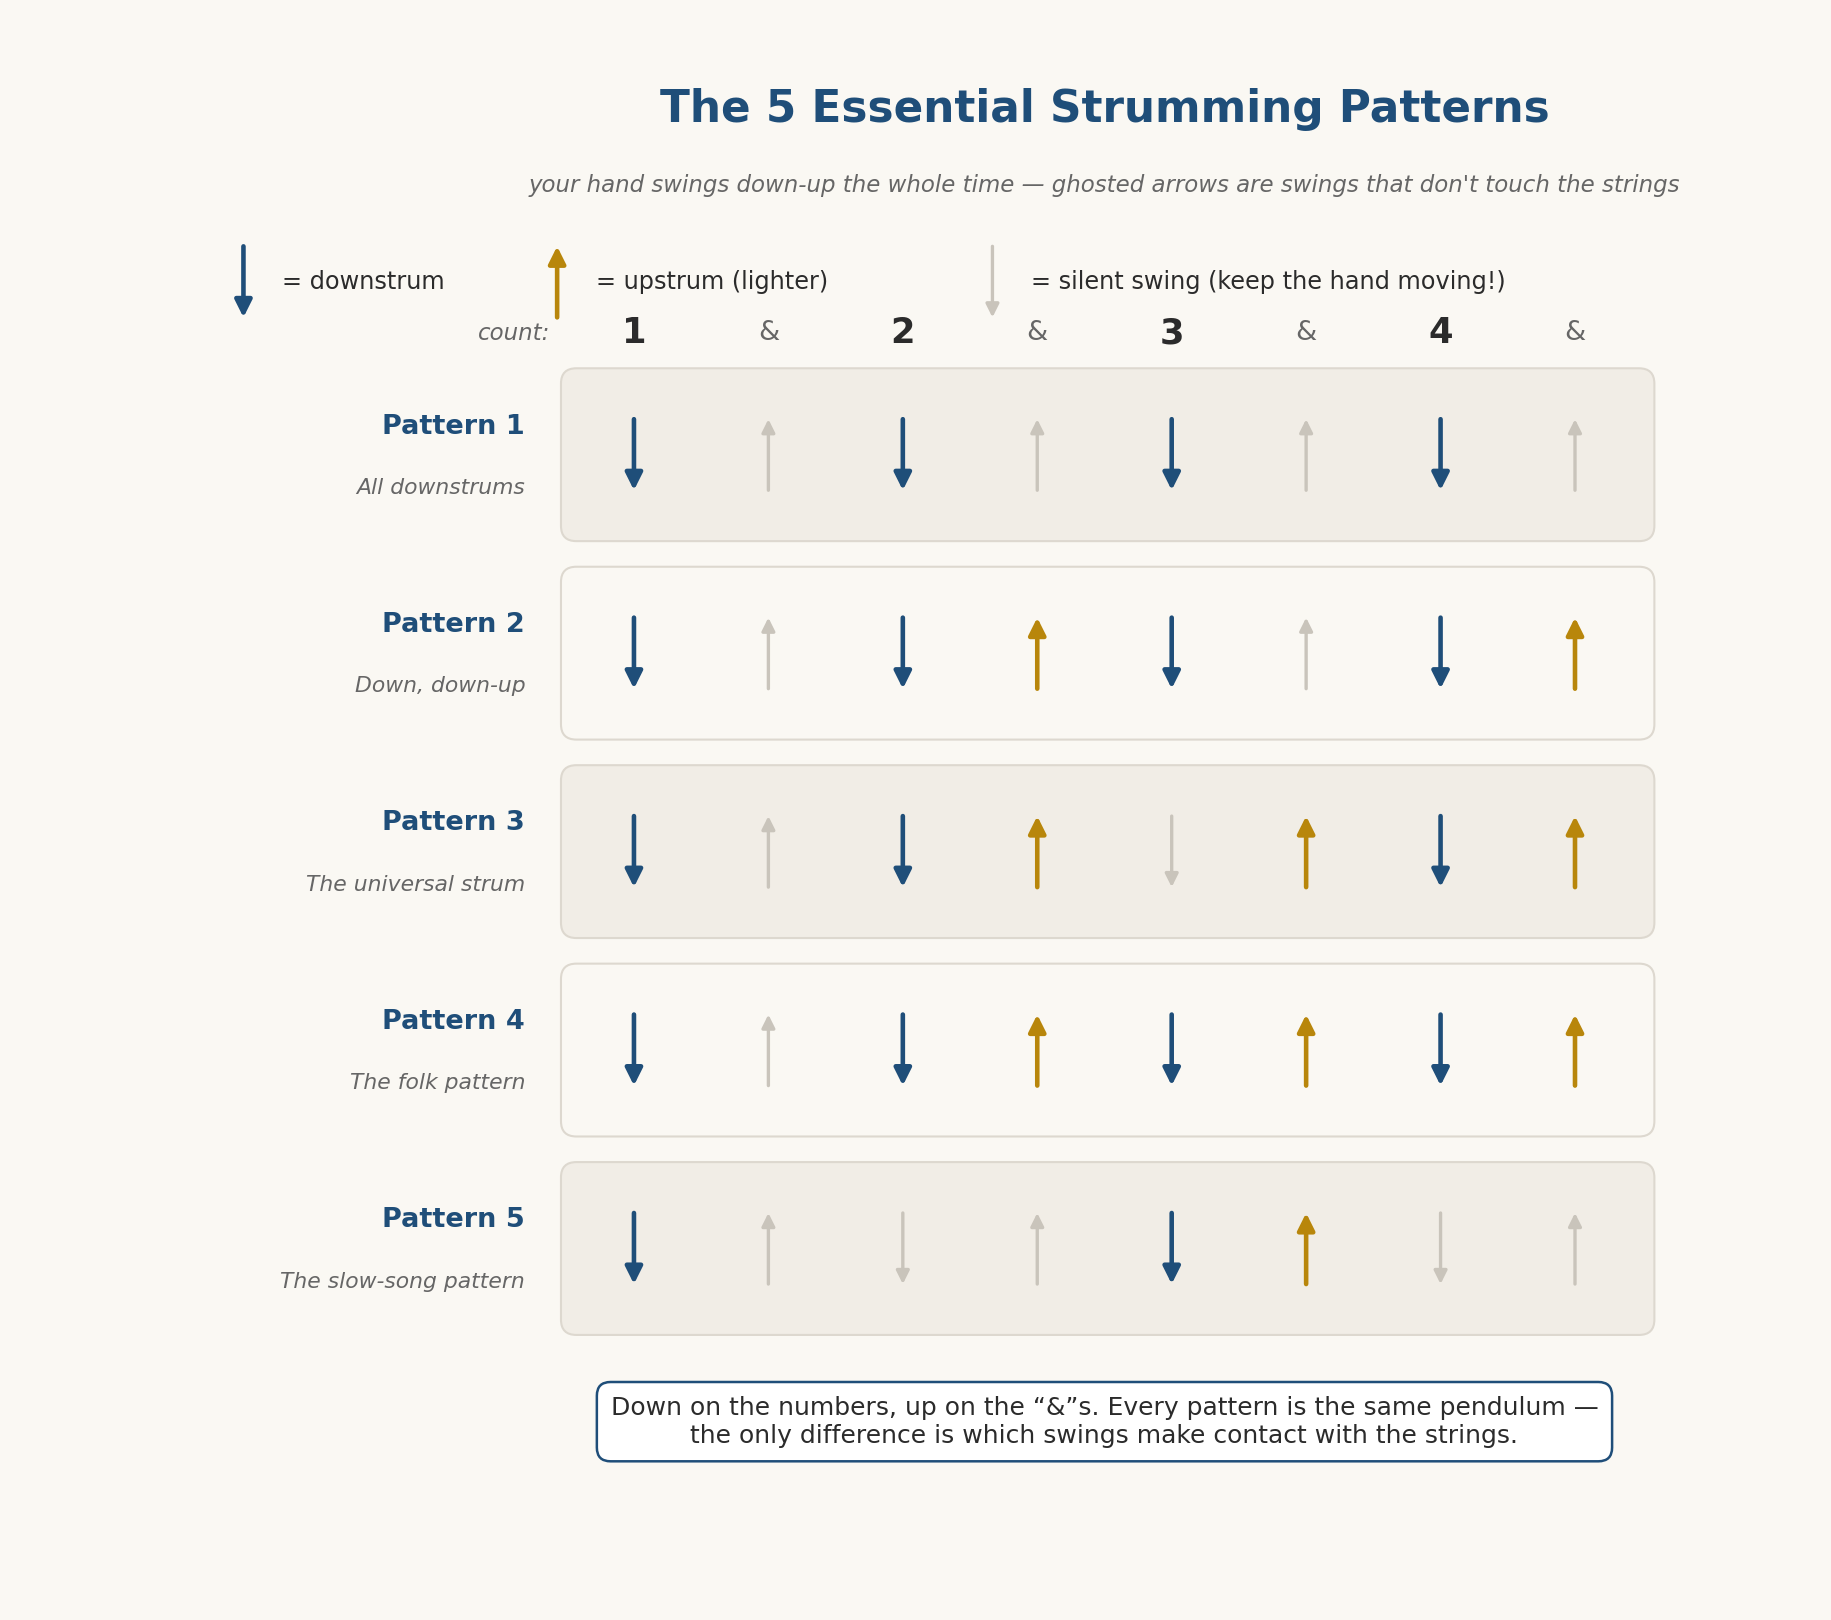
Down on the numbers, up on the &s. Eight swings per measure: four down, four up. Every pattern in this article — and nearly every pattern in existence — is just a selection of which of those eight swings actually touch the strings.
Get used to counting out loud while you practice. It feels silly and it works — counting aloud forces your sense of the beat to stay explicit while your hands learn the pattern. Once a pattern is automatic you can stop counting, but while learning, the counting is doing real work.
Pattern 1: All Downstrums (The Foundation)
Count: 1, 2, 3, 4 — a downstrum on every beat, nothing on the &s. Your hand still swings up between each downstrum; it just doesn’t touch the strings on the way up.
This is deliberately simple, and don’t skip it. It builds three things at once: the steady pendulum habit, the feel of locking your hand to a beat, and clean contact on every strum. Practice it with a metronome at 60 bpm on a single chord until the strums land exactly with the click and every strum sounds even in volume. Then practice it while switching between two chords — chord changes happen on beat 1.
Most beginners rush past this pattern in a day. Spend a week with it. The pendulum habit you build here is the foundation everything else stands on, and rebuilding it later — after learning patterns with a stopping-and-starting hand — is much harder than building it right the first time.
Pattern 2: Down, Down-Up (Adding the First Up)
Count: 1, 2 &, 3, 4 & — strums on beat 1, beat 2, the & after 2, beat 3, beat 4, and the & after 4. Written compactly: D, D-U, D, D-U.
This adds your first upstrums, and two things about upstrums matter from the start. First, upstrums are lighter than downstrums — they typically catch only the top three or four strings, not all six. That’s correct, not a mistake; the lighter upstrum is part of the natural sound of strumming. Second, the upstrum happens on the upswing your hand was already making. You’re not adding a movement; you’re letting an existing swing make contact.
This pattern appears in an enormous number of songs and is many students’ workhorse for the first months. It’s also the pattern where the pendulum principle proves itself: if your hand keeps swinging, the upstrums fall into the right time slot automatically. If your hand stops between strums, this pattern is where things start falling apart — which is the signal to go back to the pendulum, not to practice the pattern harder.
Pattern 3: The Universal Strum (D, D-U, U-D-U)
Count: 1, 2 &, (&) 3 &, 4 & — strums on beat 1, beat 2, the & of 2, then skip beat 3, then the & of 3, beat 4, and the & of 4. Written: D, D-U, _, U-D-U. Said aloud as a rhythm: “DOWN, DOWN-up, up-DOWN-up.”
This is the most famous strumming pattern in existence — often called the universal strum because it fits a remarkable share of popular songs across folk, pop, rock, and country. If you learn one pattern beyond the basics, it’s this one.
The challenge is the skipped beat 3. Your hand swings down on 3 — it must, to keep the pendulum — but it passes over the strings without touching them, then catches the strings on the way back up on the & of 3. That silent downswing is where every student initially stumbles, because the temptation is to stop the hand instead of swinging through. Practice it slowly, exaggerating the silent downswing: let your hand visibly travel down past the strings on 3, then make contact on the way up. Once your hand trusts the swing-through, the pattern clicks — usually quite suddenly after a few days of feeling impossible.
| If you only practice one thing from this article: Master the silent swing-through on the skipped beat. It’s the gateway skill to every syncopated pattern in guitar. Once your hand can pass over the strings without breaking the pendulum, every pattern becomes a matter of which swings make contact — and that’s just memory, not technique. |
Pattern 4: The Folk Pattern (D, D-U, D-U, D-U)
Count: 1, 2 &, 3 &, 4 & — a downstrum on 1, then down-up pairs on 2, 3, and 4. A busy, flowing, full sound that suits folk, country, and acoustic singer-songwriter material.
Technically this is easier than Pattern 3 — there are no skipped swings, so every movement makes contact. The challenge is evenness: with this many strums, any unevenness in volume or timing becomes audible as choppiness. The fix is dynamics: emphasize beat 1 slightly, keep the rest even and relaxed, and let the upstrums stay light. The pattern should flow like a wave, not hammer like a drumroll.
Pattern 5: The Slow-Song Pattern (D, _, D-U, _ )
Count: 1, (2), 3 &, (4) — a downstrum on 1, nothing on 2, down-up on 3, nothing on 4. Sparse and spacious, this is the pattern for ballads and slow songs, where the space between strums is part of the sound.
Sparse patterns are secretly harder than busy ones, because empty beats are where beginners lose the pulse. The pendulum is your lifeline here: your hand keeps swinging through beats 2 and 4 in complete silence, holding the time. If the hand stops during the gaps, the next strum lands wherever your guess puts it — which is how slow songs drift out of time. Practice this one with the metronome and count out loud; the discipline of feeling silent beats accurately is a skill that pays off in everything you ever play.
How to Practice a New Pattern (Any Pattern)
- Mute the strings and just do the rhythm. Rest your fretting hand lightly across the strings so they make only a percussive click, and strum the pattern. This isolates the rhythm from everything else — no chords to think about, just the pattern. Get it steady here first.
- Add one chord. Play the pattern on a single chord until it’s even and relaxed. Still no changes.
- Add a slow chord change. Two chords, switching every measure, pattern continuing through the change. The pattern will fall apart at the change at first — that’s normal. Slow down until it doesn’t.
- Take it to a song. Find a song that uses the pattern and play along. Real songs are the test and the reward.
And throughout: metronome on, tempo slower than feels necessary, counting out loud while learning. The same slow-is-fast principle from chord practice applies — a pattern practiced cleanly at 60 bpm becomes fast on its own; a pattern practiced sloppily at speed just becomes reliably sloppy.
The Problems Every Beginner Hits (And the Fixes)
“My strumming sounds stiff and mechanical”
Almost always a tension problem. Check three things: the wrist (the motion should come mostly from a loose wrist, not a locked wrist with the whole forearm swinging), the grip on the pick (firm enough not to drop, loose enough to flex slightly against the strings), and the shoulders (they creep up under concentration; drop them). Stiff strumming is tense strumming. The relaxed pendulum should feel closer to shaking water off your hand than to a controlled mechanical movement.
“I speed up or slow down without noticing”
Universal beginner experience, and the fix is unglamorous: metronome, every practice session, no exceptions. Drifting tempo means your internal clock is still developing — the metronome is how it develops. A useful drill: record yourself playing along with a metronome for a minute, then listen back. Hearing your own drift teaches the ear faster than any amount of being told about it.
“I can’t strum and change chords at the same time”
The pattern collapses every time your fretting hand moves — your brain pauses the strumming to supervise the chord change. The fix is counterintuitive: keep the strumming hand going even if the chord change isn’t finished. Strum the open strings, strum a half-formed chord, strum a buzzy mess — but do not stop the pendulum. The rule is: rhythm wins. A song with steady rhythm and a few imperfect chords sounds like music; a song with perfect chords and stopping rhythm doesn’t. The chord changes catch up to the rhythm within a few weeks of practicing this way. The reverse never happens.
“My upstrums sound weak or scratchy”
Upstrums should be lighter than downstrums — catching three or four strings rather than six is correct. Scratchiness usually means too much pick is hitting the strings or the pick angle is fighting the direction of travel. Let the pick glance across the strings at a slight angle rather than digging in flat, and hold it loosely enough that it gives a little on contact. A relaxed upstrum across the top strings is the sound you’re after — light is right.
How to Figure Out the Pattern for Any Song
Eventually you’ll want to play songs nobody has written a pattern out for. The skill is listening: put the song on, set your hand swinging in the down-up pendulum along with the beat, and listen for which swings the guitarist is letting make contact. The accents — the strums that jump out — usually land on the downbeats; the texture between them comes from the ups.
Two shortcuts while the ear develops. First, Pattern 3 (the universal strum) fits a remarkable share of songs well enough to play along — when in doubt, try it. Second, the exact original pattern matters less than beginners think: if your pattern keeps the same feel and emphasis as the record, the song works. Strumming is a feel to match, not a transcription to reproduce.
The Takeaway
Strumming looks like a large subject and is actually a small one: one pendulum motion, one counting system, and five patterns cover the substantial majority of everything you’ll want to play. The pendulum keeps the time, the patterns choose which swings make contact, and the metronome keeps you honest while the habit forms.
The priorities, in order: build the never-stopping pendulum first, master the silent swing-through second, and remember always that rhythm wins — a steady strumming hand makes everything you play sound like music, including the imperfect parts. Give each pattern its week of honest practice, take each one to a real song, and within a couple of months the question will quietly change from “how do I strum this?” to “what should I play next?”

Further Reading
- Guitar Chords for Beginners — the chords to strum these patterns on
- How to Switch Chords Faster — fixing the chord-change stumbles that break strumming patterns
- How to Use a Guitar Pick — grip, angle, and pick choice for clean strumming
- How to Play Guitar: A Complete Beginner’s Guide — where strumming fits in the full picture