The guitar pick is the smallest piece of equipment you’ll ever use, and the one beginners think about least — right up until they notice their strumming sounds scratchy, the pick keeps rotating in their fingers or flying out of their hand entirely, and nobody ever actually showed them how to hold the thing.
Pick technique is genuinely simple, but it isn’t obvious, and small errors in grip and angle cause a surprising share of the problems beginners blame on other things. This article covers how to hold a pick, how much of it to use, the angle that makes strumming smooth instead of scratchy, which pick to actually buy, and the common problems with their fixes. Ten minutes of reading, and one persistent source of beginner frustration mostly disappears.
Does a Beginner Even Need a Pick?
Quick answer to the question under the question: you don’t have to use a pick — plenty of great guitarists play with fingers — but for most beginners, learning basic pick technique early is the right call. Strumming with a pick produces a brighter, clearer, more even sound; nearly all rock, pop, and country guitar assumes one; and the technique takes days to learn, not months. Fingerstyle is a wonderful skill and worth exploring later, but it’s a separate path, not a substitute. Learn the pick now, add fingers whenever curiosity strikes.
The Grip: Thumb and the Side of the Index Finger
Here’s the standard grip, the one virtually every teacher starts students on:
- Curl your index finger loosely, as if pointing at your own palm. The other fingers can curl loosely with it or float relaxed — both are fine.
- Lay the pick on the side of that index finger — on the side of the last knuckle segment, not on the fingertip pad. The pick’s point aims away from your hand, in line with where your thumb will point.
- Bring your thumb down flat on top of the pick. The thumb pad covers the back portion of the pick, pressing it against the side of the index finger. Thumb and finger form a light pinch with the pick sandwiched between.
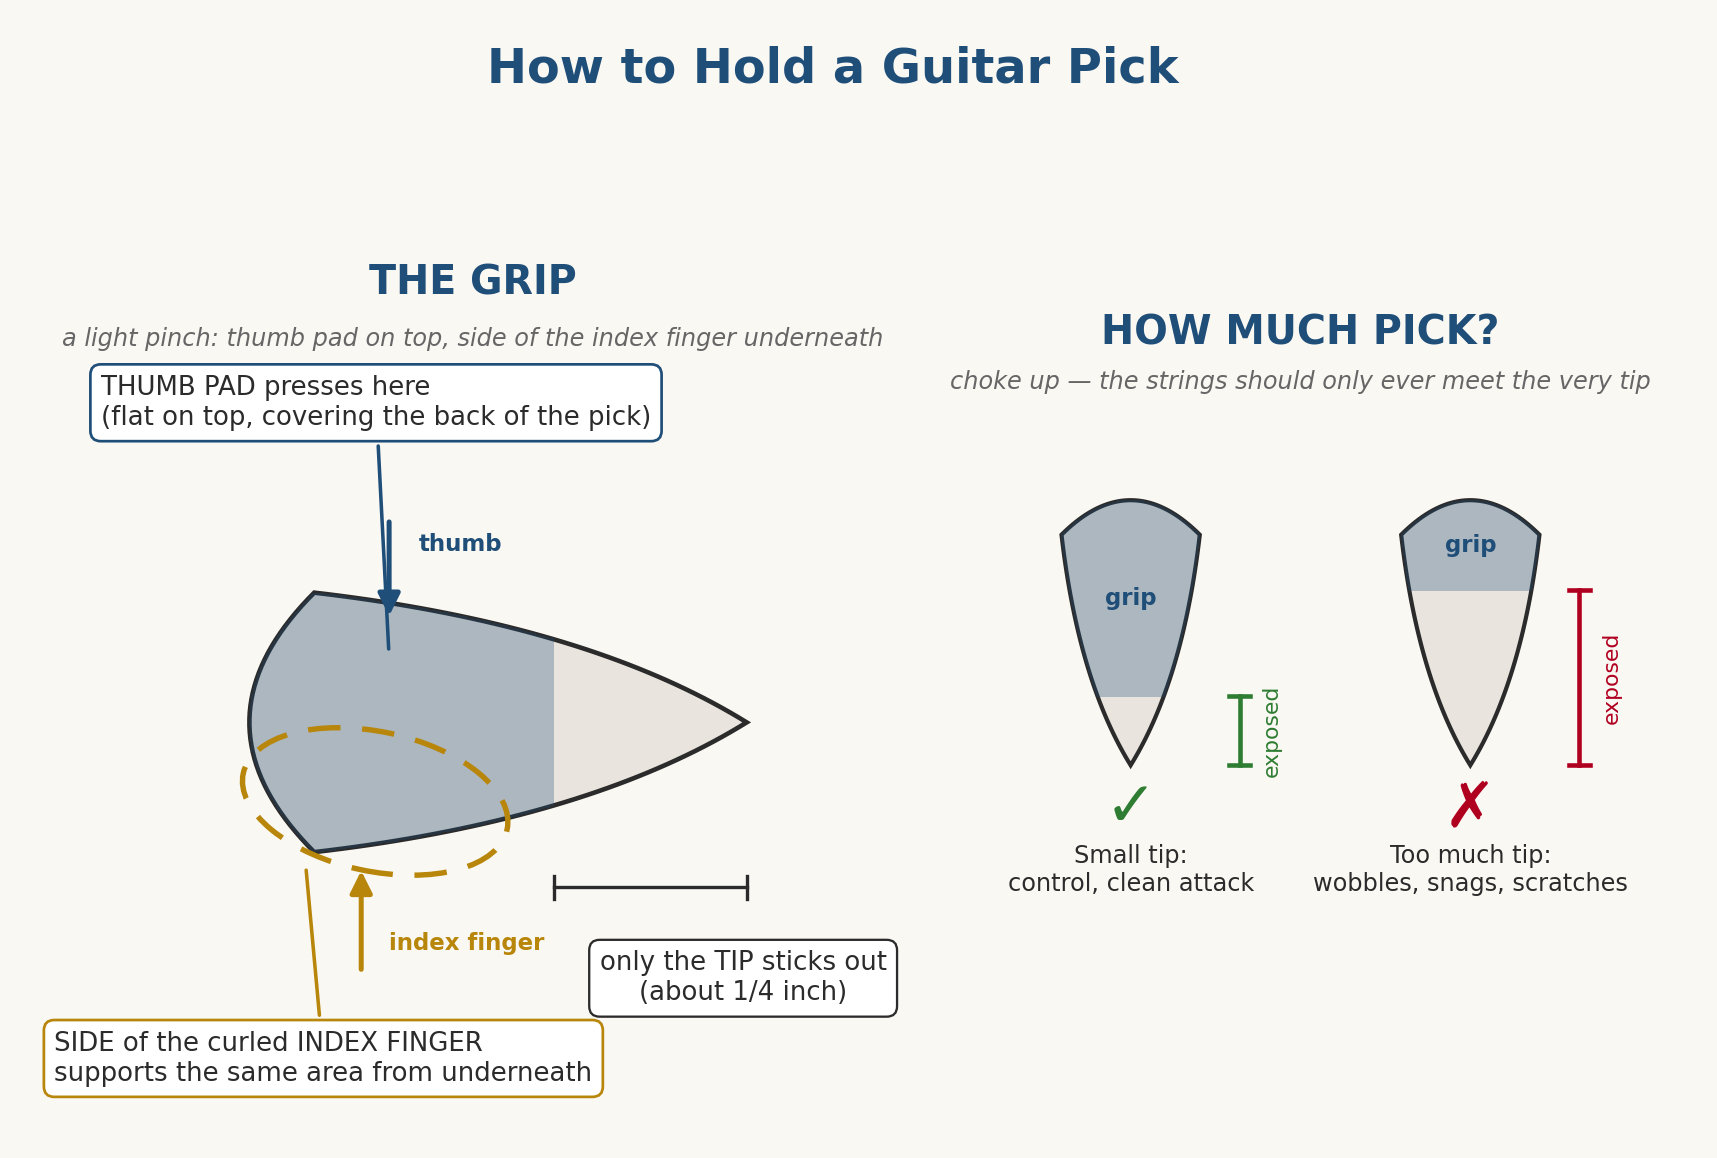
Two checkpoints. First, the pick’s point should stick out past your fingers by roughly a quarter inch — only the tip does the work (more on this below). Second, the pick sits on the side of the index finger, not gripped between two fingertip pads like a coin. The pad-to-pad coin grip is the most common self-taught error: it feels secure, but it puts the pick at an awkward angle, hides most of your control, and is why self-taught pickers so often struggle with rotation and scratchiness.
How tight to hold it
Looser than you think. The grip should be firm enough that the pick doesn’t fly out of your hand, and loose enough that the pick can flex and give slightly when it contacts the strings. That little bit of give is a feature — it smooths out your strumming and absorbs unevenness. A death-grip on the pick transmits every tension in your hand straight into the sound, and a tense pick hand makes the whole arm stiff.
Here’s the calibration test, same philosophy as finger pressure on the fretting hand: hold the pick with your normal grip, strum a few times, then deliberately loosen the grip until the pick actually shifts or slips. Now add back just enough pressure to keep it stable. That’s the right amount — and for most beginners it’s half of what they were using. Expect to drop the pick regularly for the first couple of weeks. That’s the sign you’re holding it correctly, not incorrectly; the grip security comes from technique settling in, not from squeezing harder.
How Much Pick to Use
Only the tip — roughly a quarter inch of the pick should extend beyond your fingers and contact the strings. This surprises beginners, who tend to leave half the pick sticking out.
The physics is simple: the more the pick extends past your grip, the more it wobbles, snags, and flaps against the strings — that’s the scratchy, clacky sound, and it’s also how picks get yanked out of loose grips. A short tip gives you control and a clean attack; the strings meet a firm point rather than a floppy blade. If your strumming sounds like it has a layer of pick-noise static over it, choking up on the pick is fix number one.
The Angle: The Secret to Smooth Strumming
This is the least-known technique and arguably the most important one for strumming. The pick should not hit the strings perfectly flat, face-on. It should be tilted slightly, angled a few degrees, so the pick slices across the strings rather than slapping against them.
Picture the pick’s flat face meeting the strings square-on: each string has to push the entire stiff face out of the way, one after another — clack, clack, clack. Now tilt the top edge of the pick slightly forward in the direction of travel: each string now slides off the pick’s edge smoothly, like water off an angled blade. The sound changes immediately — from percussive scratching to a smooth, even brush.
You don’t need to consciously hold an angle measurement. Tilt the pick slightly downward for downstrums and let your wrist naturally reverse the tilt on upstrums — with a relaxed grip, the pick largely finds the angle itself as it gives against the strings. The instruction is mostly: stop forcing the pick flat. Relax the grip, allow a slight tilt, and let the strings push the pick into its natural glide.

| If your strumming sounds scratchy: Ninety percent of the time it’s one of three things, in order of likelihood — too much pick sticking out, the pick hitting the strings dead flat, or a too-tight grip preventing the pick from giving. All three take seconds to check and adjust. |
Picking Single Notes
Strumming sweeps across many strings; picking targets one. The grip stays identical — what changes is the scale of the motion and the precision required.
For single notes, the motion comes from the wrist and is small — the pick travels just far enough to sound the string and clear it, settling near the next string rather than swinging away. Beginners pick with big arm motions that have to find their way back for every note; accuracy and speed both come from keeping the motion compact.
Start with all downstrokes on one string, slow, with a metronome. Then practice alternate picking — down-up-down-up — which is the same pendulum logic as strumming applied in miniature, and the default picking technique for nearly everything. Then practice crossing strings: two notes on one string, two on the next. These three drills, a few minutes each as part of warmup, build single-note control steadily without needing a dedicated practice block.
Which Pick Should You Buy?
Stand in front of the pick display at any guitar store and you’ll face dozens of thicknesses, shapes, and materials. Here’s what actually matters for a beginner, and what doesn’t.
Thickness — the one variable that matters
Picks range from thin (under 0.60mm), through medium (0.60–0.80mm), to heavy (0.80mm and up). The trade-off: thin picks flex a lot, which makes strumming forgiving and smooth but single notes mushy and imprecise. Heavy picks are rigid — precise for single notes, but unforgiving for strumming, where every flaw in your angle and grip comes through.
The standard recommendation, which is standard because it’s right: start with medium, around 0.73mm. It flexes enough to keep strumming forgiving while staying firm enough that single notes speak clearly. As you develop, you may drift thinner (if you mostly strum) or heavier (if you move toward lead playing) — and that drift will be guided by your own preference, which is exactly how it should work. But 0.73mm-ish medium is the correct first pick for essentially everyone.
Shape and material — mostly preference
The standard teardrop shape is standard for a reason; start there. Material (celluloid, nylon, Tortex and its cousins) affects tone and grip-feel subtly — differences you’ll care about later and shouldn’t agonize over now. Some picks come with textured or rubberized grip surfaces, which genuinely help if dropping the pick is driving you crazy, but a correct relaxed grip solves that problem better than texture does.
The honest purchasing advice: buy a variety pack of a dozen medium-ish picks for a few dollars. You’ll lose them constantly anyway — picks migrate to couch cushions, pockets, and other dimensions at a rate science cannot explain — and the variety lets you feel small differences and form your own preference cheaply. There is no meaningful quality difference between a 50-cent pick and a boutique one at the beginner stage. Spend the money on strings instead.
Common Pick Problems and Their Fixes
“The pick keeps rotating in my fingers”
Some rotation is normal — every guitarist makes micro-adjustments constantly, and you’ll develop the unconscious habit of nudging the pick back into place between phrases. Excessive rotation usually traces to gripping with the fingertip pad instead of the side of the index finger, or to too much pick extending past the grip, catching and twisting on the strings. Check both. A grip-textured pick papers over the symptom; the grip fix removes the cause.
“I keep dropping the pick mid-song”
Two phases of this problem. In the first weeks, dropping is just calibration — you’re finding minimum grip pressure, and the occasional drop is the cost of not strangling the pick. It fades. If it persists past the first month, the usual cause is sweat — in which case, wipe the pick on your jeans like every guitarist in history, or get one textured pick for sweaty situations. Also worth checking: a pick that sits too deep in your grip with too little tip out can lever itself loose against the strings.
“Picking single notes, I keep hitting the wrong string”
Accuracy comes from a compact motion and from your hand having a reference point. Many players lightly rest their picking-hand pinky or the heel of their palm against the guitar body or bridge — an anchor that gives the hand a consistent sense of where it is relative to the strings. Experiment with a light anchor (light is the key word; pressing hard creates tension), shrink the picking motion, and slow down to the speed where you hit the right string every time. Accuracy first, speed after — the same rule as everything else in guitar.
“My hand gets tired or cramps while strumming”
That’s tension, and the pick grip is usually where it starts. A clenched pick climbs the chain: tight fingers, tight wrist, tight forearm, sore shoulder. Do the loosen-until-it-slips calibration again, shake the hand out, and restart relaxed. Strumming for ten minutes should be no more tiring than waving for ten minutes — if it is, the grip is working too hard.
The Takeaway
Pick technique is a small subject that punches far above its weight: the grip (side of the curled index finger, thumb on top), the amount (just the tip), the pressure (looser than you think), and the angle (slightly tilted, never dead flat) together determine whether your strumming sounds smooth or scratchy and whether your picking hand stays relaxed or fights you.
Buy a variety pack of mediums around 0.73mm, expect to drop the pick for a couple of weeks while the relaxed grip calibrates, and check the three scratchiness culprits whenever the sound goes wrong. None of this takes long to learn — and once it settles in, the pick disappears from your awareness entirely, which is exactly where it belongs. The pick is the connection between your rhythm and the strings; make it a relaxed one and everything downstream sounds better.

Further Reading
- Strumming Patterns for Beginners — the patterns this pick technique is for
- How to Play Guitar: A Complete Beginner’s Guide — the full beginner foundation
- Holding the Guitar Correctly — the posture this technique sits within
- How to Switch Chords Faster — what the fretting hand should be doing meanwhile