Forming a single chord cleanly is one thing. Switching between two chords smoothly, in time, without a long stumbling pause is a completely different skill — and it’s the one that separates beginners who can technically play chords from beginners who can actually play songs. It’s also the single most common place students get stuck for weeks longer than they need to.
The good news: slow chord changes are almost never a talent problem. They’re a practice-method problem. Most students practice chord switching in a way that’s far less efficient than it could be, which is why progress feels glacial. This article explains why chord changes feel slow, then walks through a specific practice method that produces faster, cleaner switching — for any student, on any chords.
Why Chord Changes Feel So Slow
When you switch from one chord to another, your hand has to do several things almost simultaneously: lift the current fingers, move them through space, and re-plant them in a new shape on the correct strings and frets, all while your strumming hand keeps the rhythm going. Early on, your hand does these steps one at a time, consciously, which is why there’s a long pause between chords. The goal of practice is to compress those separate conscious steps into a single automatic motion.
The reason this takes time is physical, not mental. You already know where the chords are — you can form each one if given a few seconds. What you’re building is the muscle memory that lets your hand find the new shape without conscious thought. That kind of automatic motor pattern only develops through many repetitions, and there’s no way to skip the repetitions. But there are much more and much less efficient ways to do them, and most beginners are using the less efficient ways.
The Five Mistakes That Keep Chord Changes Slow
Before the method, it’s worth naming the specific habits that slow students down. Most beginners are doing at least two or three of these without realizing it.
Mistake 1: Practicing too fast
The instinct is to practice chord changes at the speed you eventually want to play them. This backfires. Practicing fast means practicing sloppily — buzzing strings, fingers landing slightly wrong, the chord not quite ringing. You end up rehearsing the mistakes. Slow, clean practice builds the correct motor pattern; fast, sloppy practice builds an incorrect one that you’ll later have to undo. Slow is genuinely faster in the long run.
Mistake 2: Moving fingers one at a time
Watch a beginner switch chords and you’ll often see the fingers arrive at the new chord one by one — index finger lands, then middle, then ring, each placed separately. This is natural at the very start but becomes a bottleneck. The fingers need to learn to move as a unit, arriving at the new shape together. This is the single biggest mechanical difference between slow and fast chord switching.
Mistake 3: Lifting fingers too far off the strings
When switching chords, many students lift their fingers high off the fretboard, then bring them back down. Every extra millimeter of travel is wasted time. Efficient chord switching keeps the fingers low and close to the strings, moving the minimum distance necessary. Keeping fingers hovering just above the fretboard rather than flying off it shortens every transition.
Mistake 4: Ignoring common fingers between chords
Many chord pairs share a finger on the same string and fret, or have a finger that barely moves. Students who reset their entire hand on every change are doing far more work than necessary. Recognizing which fingers can stay put — or barely move — turns a big hand reset into a small adjustment. More on this below, because it’s one of the highest-leverage techniques available.
Mistake 5: Stopping the strumming hand to wait for the chord
When the chord change is slow, beginners instinctively stop their strumming hand and wait until the new chord is formed before strumming again. This feels logical but reinforces the pause. Keeping the strumming hand moving in steady rhythm — even strumming muted or incomplete chords during the transition — trains the timing that real playing requires. The strumming hand should be the metronome the fretting hand learns to keep up with, not a passenger that waits.
The Core Method: Slow, Deliberate, Repeated Transitions
Here’s the practice method that actually works. It’s not complicated, but it requires patience and the discipline to go slower than feels natural.
Step 1: Pick one chord pair
Don’t practice switching between five chords at once. Pick exactly two — ideally a pair that appears in songs you want to play. G to C, or G to D, or Em to C, whatever’s relevant. Mastering one pair at a time and then combining them later is far more efficient than trying to drill all transitions simultaneously.
Step 2: Form each chord and study the move
Form the first chord. Look at your hand. Now form the second chord. Look again. Notice specifically: which fingers move? Which stay roughly in place? What’s the shortest path each moving finger can take? This conscious analysis, done once at the start, makes the repetitions that follow far more productive. You’re giving your hand a map before asking it to run the route.
Step 3: The slow-motion switch
Form the first chord. Strum it once to confirm it’s clean. Now switch to the second chord as slowly as you need to in order to land all fingers in the right place simultaneously. Strum to confirm it’s clean. Switch back. The speed doesn’t matter at all here — what matters is that every landing is clean and the fingers arrive together. If you’re landing one finger at a time, slow down further until you can land them together.
Step 4: Add a metronome at a slow tempo
Once the slow-motion switch is reliable, add a metronome at around 50 beats per minute. Form the first chord on beat 1. Switch to the second chord and have it ready by beat 3. Switch back by beat 5. Continue. The metronome isn’t there to push you faster — it’s there to give the transition a consistent, predictable window so your hand learns to complete the move in a fixed amount of time.
Step 5: Increase tempo gradually
Only when you can hit the chord changes cleanly and consistently at the current tempo, increase the metronome by about 5-10 beats per minute. If the changes get sloppy at the new tempo, drop back down. The progression should feel almost too easy at each step — that’s the sign you’re building clean motor memory rather than rushing into sloppiness. Over days and weeks, the comfortable tempo creeps up, and one day you realize the change that took three seconds now happens without thought.
| The key principle: Practice at the fastest speed where you can still switch cleanly — and not one notch faster. Speed is a byproduct of clean repetition, not something you force directly. Every student who tries to force speed ends up practicing sloppiness and plateaus. Every student who prioritizes clean changes at a manageable tempo eventually gets fast without ever specifically trying to. |
The Highest-Leverage Trick: Pivot Fingers and Common Shapes
This deserves its own section because it’s the technique that produces the biggest single jump in chord-switching speed for most students.
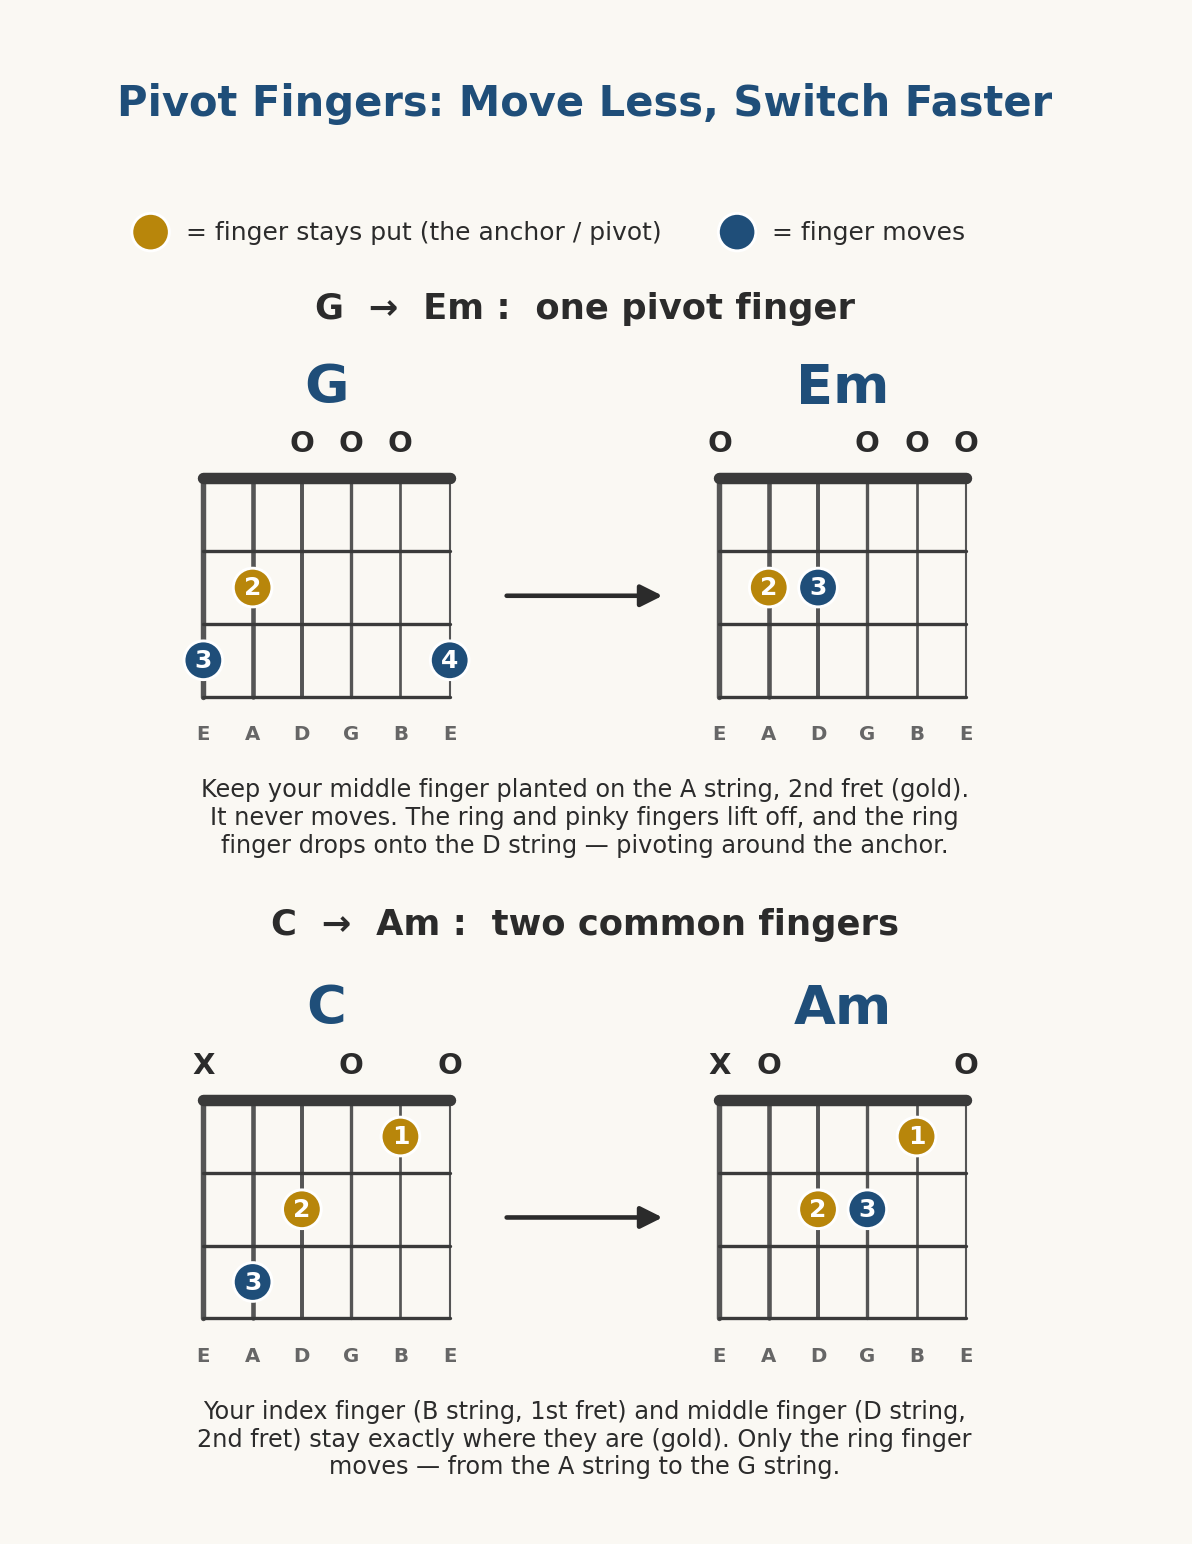
Many chord pairs share a finger that doesn’t need to move — or barely needs to move — between the two chords. That shared finger is called a pivot finger or anchor finger. If you keep it planted (or nearly planted) during the switch, you reduce the number of fingers that have to travel, which makes the whole change faster and gives your hand a stable reference point.
Examples of pivot fingers
Between certain common chords, one finger stays on the same string and fret, or stays on the same string and just slides a fret or two. Rather than lifting the entire hand and re-planting it from scratch, you keep the pivot finger as an anchor and move only the other fingers around it. The pivot finger acts as a hinge that the rest of the hand rotates around, and it gives your hand a consistent point of reference so the moving fingers know where they are.
When you learn a new chord pair, the first thing to check is whether there’s a pivot finger or a common shape between them. If there is, use it. This single habit — looking for the anchor before drilling the change — separates students who switch chords efficiently from students who reset their whole hand every time and wonder why it’s so slow.
Common shapes between chords
Beyond single pivot fingers, some chords share an entire partial shape — two fingers that stay in the same relationship to each other and just move together to a new position. Recognizing these shared shapes lets you move a pre-formed cluster of fingers as a unit rather than rebuilding it. This is more advanced, but it develops naturally once you start paying attention to what fingers actually do during transitions rather than just resetting blindly.
The ‘One-Minute Changes’ Exercise
This is a classic, genuinely effective drill for building chord-switching speed, and it has the advantage of giving you a concrete number to track over time.
- Pick two chords. Set a timer for one minute.
- Switch back and forth between the two chords as many times as you cleanly can in that minute. Count each clean change — one where both chords actually ring, not a buzzy half-formed mess. Sloppy changes don’t count.
- Write down your number. Maybe it’s 10 clean changes in the first week. Maybe 5. Whatever it is, it’s your baseline.
- Repeat daily and track the number. Over days and weeks the count climbs. Watching it go from 10 to 20 to 40 clean changes per minute is concrete, motivating evidence of progress that’s otherwise invisible.
The reason this exercise works so well is that it makes progress measurable. Chord-switching improvement is normally invisible from inside the practice session — it feels like nothing’s changing day to day. The one-minute count turns that invisible progress into a number you can watch climb, which is both motivating and a useful diagnostic. If the number stops climbing, that’s a signal to check whether you’ve drifted into one of the five mistakes above.
How Long This Actually Takes
An honest timeline, assuming daily practice of 15-20 minutes with some portion devoted to chord switching:
- First week or two: Changes are slow and require a visible pause. This is normal. You’re building the basic motor pattern from nothing.
- Weeks 3-4: The most-practiced chord pairs start to feel less effortful. You can switch between two well-drilled chords with only a short pause.
- Months 2-3: Common chord changes start happening in close to real time. You can play simple songs at a slow but steady tempo without stopping between chords.
- Months 4-6: Most common chord transitions feel automatic. New chord pairs still need dedicated practice, but the ones you use regularly no longer require conscious thought.
These are reasonable expectations, not guarantees. Some chord pairs are inherently harder than others and take longer. The transition involving a full barre chord, in particular, takes considerably longer than open-chord transitions because it requires building finger strength in addition to the movement pattern. Don’t measure your progress on the hardest transitions; measure it on the common open-chord changes that make up most beginner songs.

Common Questions
Should I look at my fingers while switching?
In the early stages, yes — watching your fingers helps them land correctly. But work toward not looking, because in real playing you’ll often need your eyes elsewhere (on a chord chart, on other musicians, on a screen). A good progression: start by watching, then deliberately practice the well-drilled changes without looking once they’re reliable. The not-looking skill develops surprisingly fast once you start practicing it.
Why does one specific chord change feel impossible?
Almost every student has one transition that feels much harder than the rest — often anything involving moving to or from a C or an F. Usually it’s because that change involves more finger travel or an awkward stretch than the others. The fix is simply more dedicated, slow practice on that specific pair. The hardest change for you is the one that most deserves the targeted practice time, even though it’s the one you’ll naturally want to avoid.
Is it normal for changes to get worse some days?
Yes. Motor skills fluctuate day to day, and some days a change you had down cold will feel clumsy again. This is normal and not a sign of regression. The overall trend over weeks is what matters, not any single day. The one-minute-changes count will be noisy day to day but trend upward over time.
The Takeaway
Slow chord changes are almost never about talent. They’re about practice method. The students who switch chords fast aren’t gifted — they practiced slowly and cleanly, looked for pivot fingers, kept their fingers close to the strings, moved fingers as a unit, and kept their strumming hand in rhythm. Every one of those is a learnable habit, not an innate ability.
Practice the specific pairs you need, go slower than feels natural, prioritize clean landings over speed, and track your progress with the one-minute exercise. The speed comes on its own — not by chasing it directly, but as the natural byproduct of many clean, deliberate repetitions. Trust the method and give it the weeks it needs. The change that feels impossible today will feel automatic within a couple of months of honest practice.

Further Reading
- Guitar Chords for Beginners — the 8 essential chord shapes to practice switching between
- How to Play Guitar: A Complete Beginner’s Guide — the foundational pillar this supports
- Open Chords vs Barre Chords — why barre-chord transitions take longer, and how to approach them
- Your First Week with Guitar — where chord switching fits in the first seven days