Twenty years of teaching guitar has taught me one thing about beginners: nearly everyone tries to learn too many chords too fast. They download a chart with sixty shapes on it, get overwhelmed by week two, and decide they aren’t musical.
You don’t need sixty chords. You need eight.
Master the eight guitar chords for beginners on this page and you can play thousands of songs. Country, rock, folk, pop, blues — the bones of nearly every popular guitar song are built from these chords or simple variations of them. The Beatles built half their early catalog on five of them. Bob Dylan barely strayed from this list for years.
This is a working pillar page. Bookmark it. Each chord includes a clean diagram, finger-by-finger instructions, the common mistakes I see in lessons, and what to listen for when you strum. At the end you’ll find two progressions you can practice tonight.
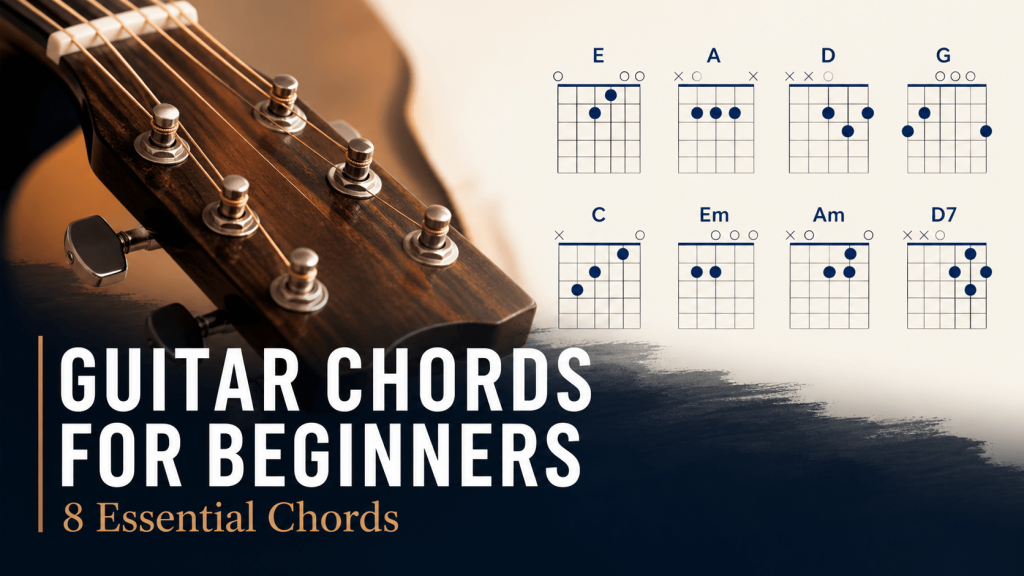
How to Read a Chord Diagram
If you’ve never read a chord diagram before, take thirty seconds with this. Every diagram on this page follows the same convention.
The thick black bar at the top is the nut — the piece of plastic at the top of the guitar where the neck meets the headstock.
The vertical lines are strings. The leftmost line is the thickest (lowest-pitched) string, called the low E. The rightmost line is the thinnest, called the high E. In between, from left to right, are A, D, G, and B.
The horizontal lines below the nut are frets — the metal bars on the neck. The space between the nut and the first horizontal line is the first fret.
The blue circles tell you where to press your fingers, and the number inside each circle tells you which finger to use:
- 1 = index finger
- 2 = middle finger
- 3 = ring finger
- 4 = pinky
Above the nut you’ll see two more symbols. O means play that string open (don’t press it down at all, but do strum it). × means don’t play that string — either skip it when you strum, or lightly mute it with a finger you already have on the fretboard.
That’s it. Every chord diagram for the eight guitar chords for beginners on this page works the same way.
The 8 Essential Beginner Chords
I’m going to teach these in the order I teach them in lessons — easiest first. There’s a reason for the sequence. Each chord builds finger strength and shape memory that prepares you for the next one. Don’t jump ahead.
1. E Minor (Em)
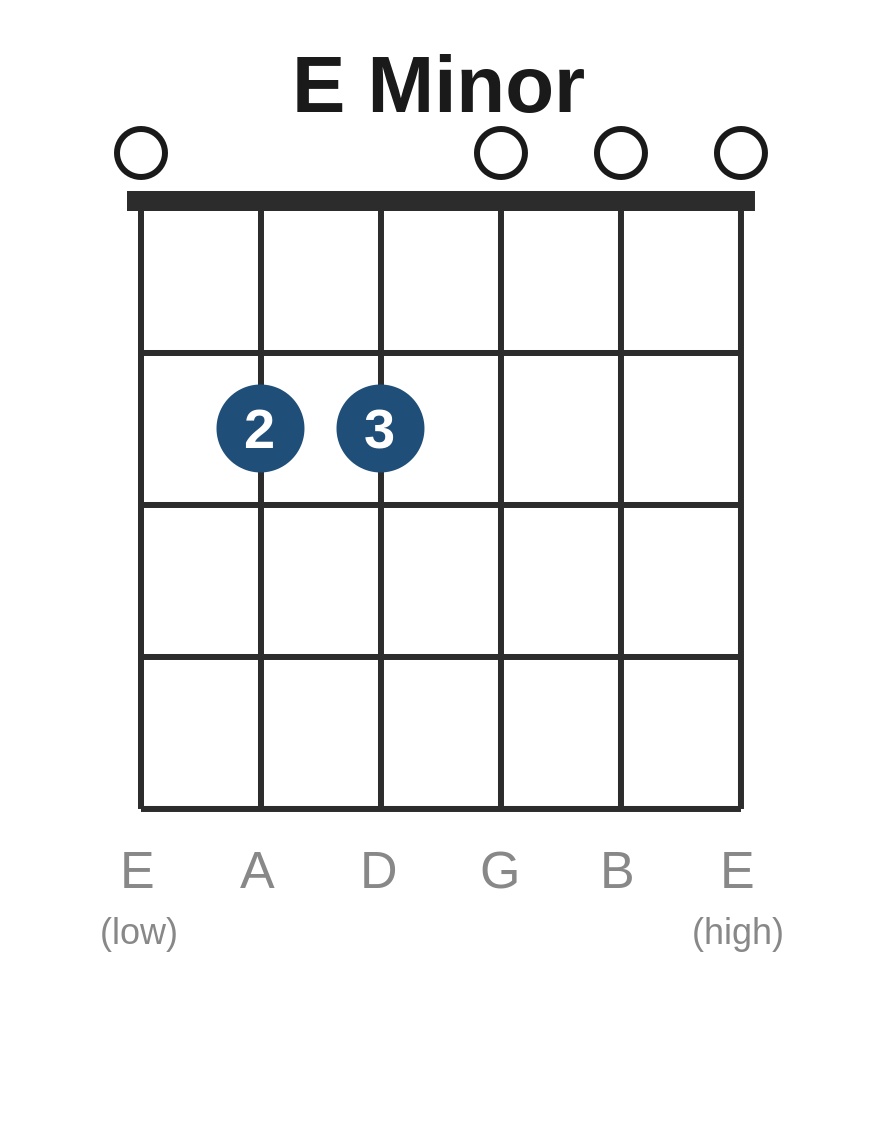
E minor is the chord I always teach first because it requires only two fingers and uses every string. There’s no muting, no awkward stretches, no wrong notes lurking. You can hit it wrong and it still sounds right.
How to play it:
- Place your middle finger on the 2nd fret of the A string (5th string from the top).
- Place your ring finger on the 2nd fret of the D string (4th string from the top).
- Strum all six strings.
What to listen for: A full, slightly melancholy sound — that’s the “minor” flavor. If any string sounds muted or buzzy, your fingers are touching adjacent strings. Arch your knuckles more so you press straight down on the tip of each finger.
Common mistake: Pressing too hard. Em sounds clean with surprisingly light pressure. Most beginners crush the strings and tense up. Press just hard enough to get a clear note — not harder.
2. A Minor (Am)
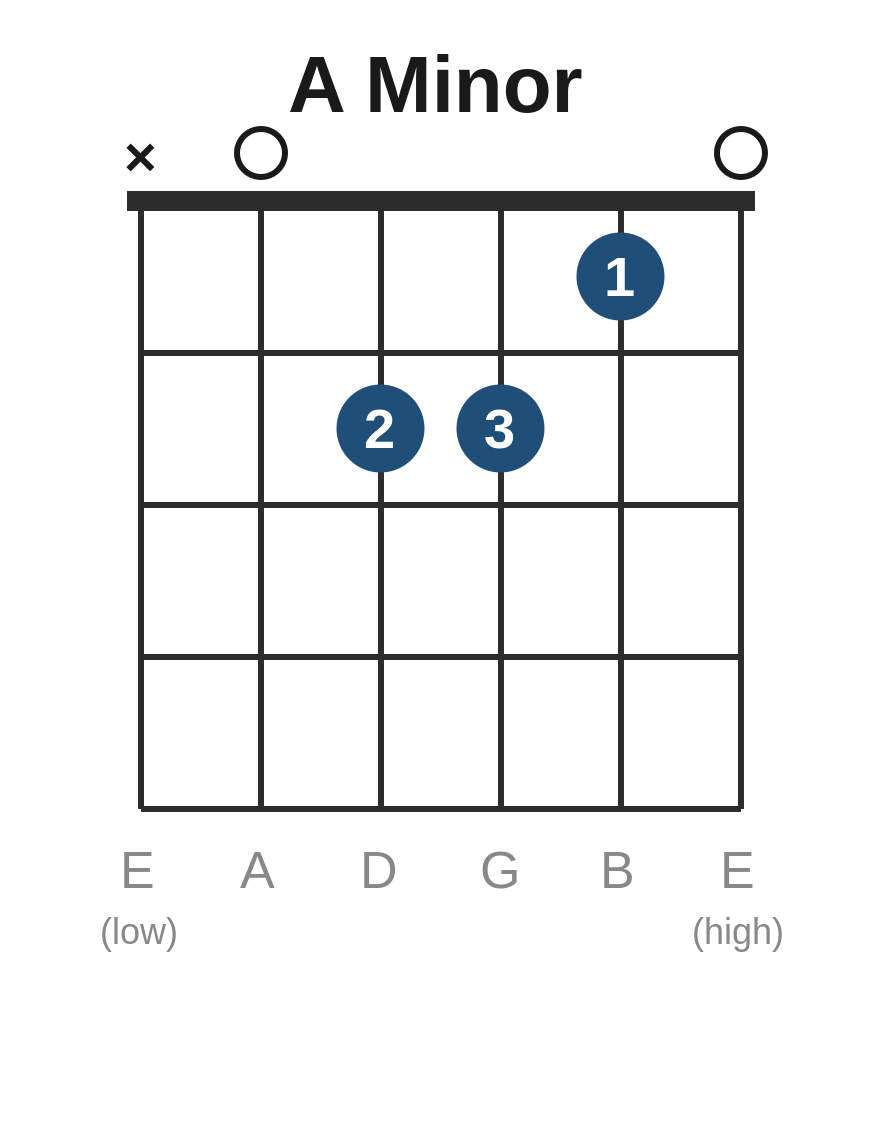
Once you can play Em, A minor is a small step. Same minor sound, different pitch, three fingers instead of two.
How to play it:
- Place your index finger on the 1st fret of the B string (2nd from the bottom).
- Place your middle finger on the 2nd fret of the D string.
- Place your ring finger on the 2nd fret of the G string.
- Don’t play the low E string (the thickest). Strum the bottom five.
What to listen for: Same sad-sounding minor quality as Em, slightly higher in pitch. The high E string should ring out clearly above the chord.
Common mistake: Letting the index finger lay flat and accidentally muting the high E string. Curl your index finger so only the very tip touches the B string.
3. D Major
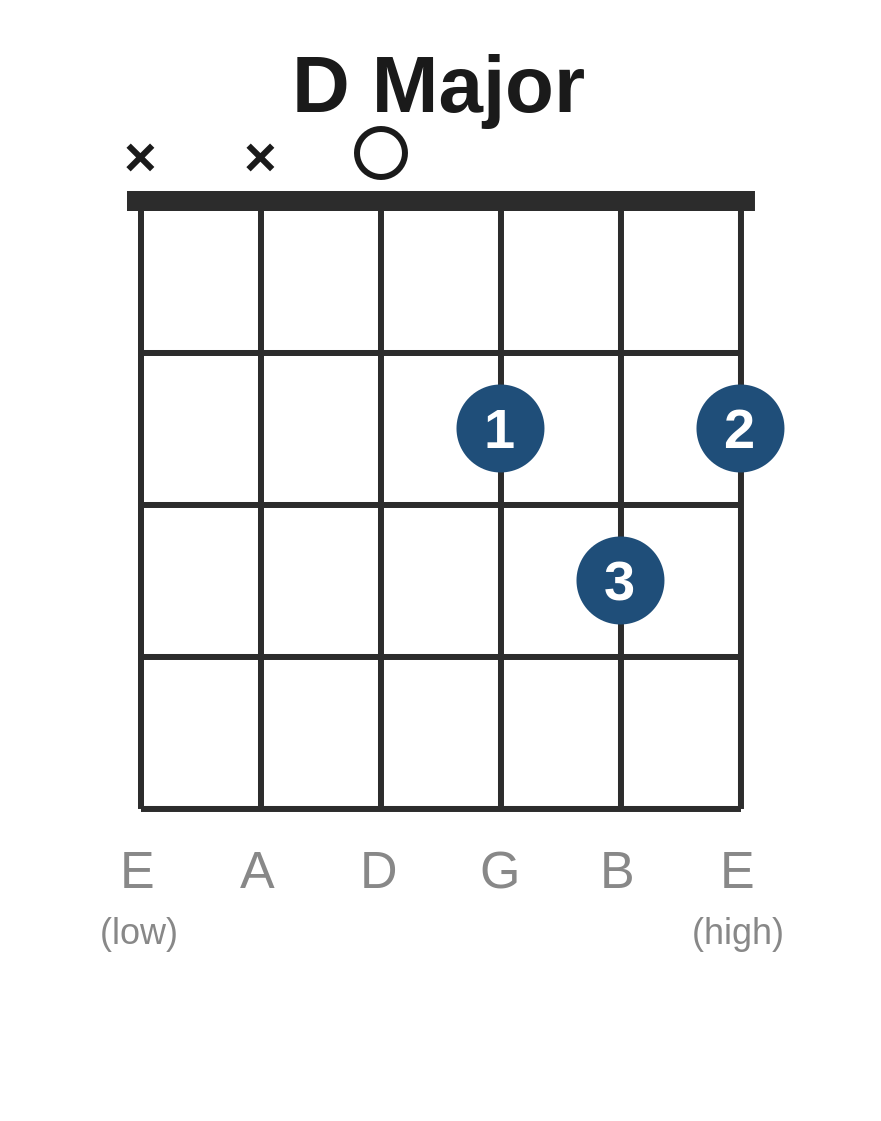
D is your first major-sounding chord. After two minor chords, this is going to feel suddenly cheerful — that’s the major quality.
How to play it:
- Place your index finger on the 2nd fret of the G string.
- Place your middle finger on the 2nd fret of the high E string (the thinnest).
- Place your ring finger on the 3rd fret of the B string.
- Don’t play the low E or A strings. Strum only the bottom four strings.
What to listen for: A bright, clear, almost ringing sound. Each of the four strings you’re strumming should sound distinct.
Common mistake: Strumming all six strings. The low E and A aren’t part of D major — they’ll muddy the chord. Strum starting from the open D string. Many beginners struggle with this until they accept that not every chord uses every string.
4. E Major
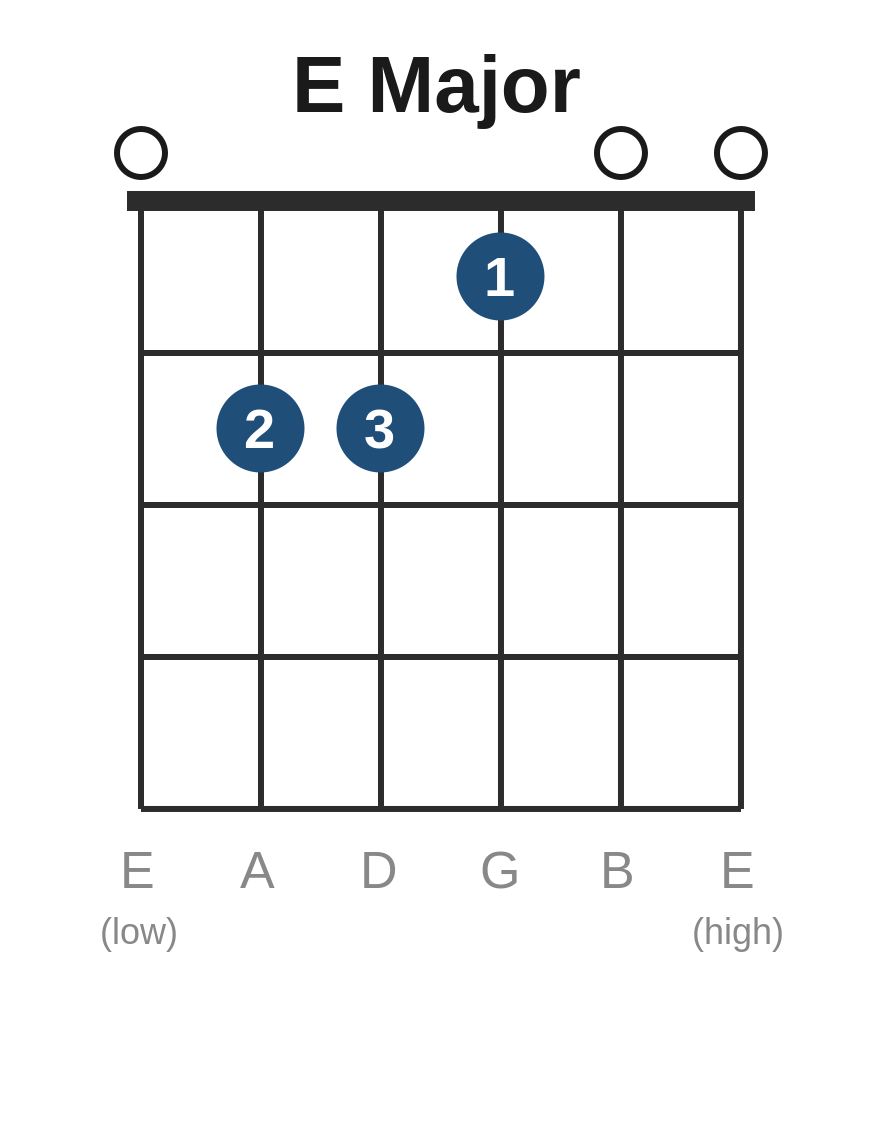
E major uses the same finger positions as A minor, just on different strings. If you can play Am, you almost already know E.
How to play it:
- Place your index finger on the 1st fret of the G string.
- Place your middle finger on the 2nd fret of the A string.
- Place your ring finger on the 2nd fret of the D string.
- Strum all six strings.
What to listen for: A big, full, classic-rock sound. E major is one of the most powerful-sounding open chords on the guitar — it’s the open chord most rock songs in the key of E start with.
Common mistake: Confusing E with Em. The only difference between E major and E minor is one finger — the index on the G string. That single fret turns sadness into triumph. Practice switching between them to feel the difference.
5. A Major
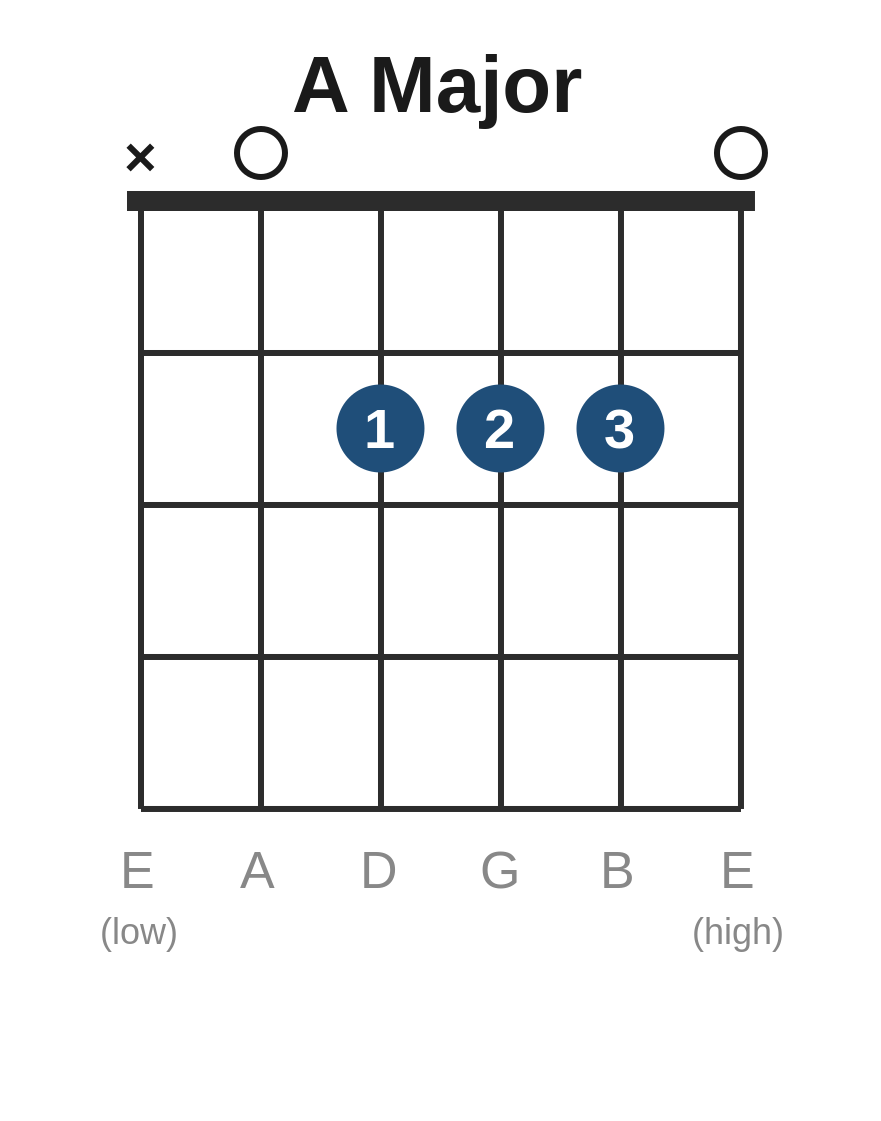
A major is the first chord that requires three fingers in the same fret. It’s a tight squeeze for new players, especially anyone with larger hands.
How to play it:
- Place your index finger on the 2nd fret of the D string.
- Place your middle finger on the 2nd fret of the G string.
- Place your ring finger on the 2nd fret of the B string.
- Don’t play the low E. Strum from the open A string down.
What to listen for: A bright, full chord. The high E string rings open and brings a lot of brightness to the sound.
Common mistake: The three fingers cramping together and muting the high E. If your high E sounds dead, your ring finger is probably leaning over and touching it. Some players solve this by playing A with a small barre — using the index finger flat across the 2nd fret of the D, G, and B strings. Try both ways and use whichever produces a cleaner sound.
6. D Minor (Dm)
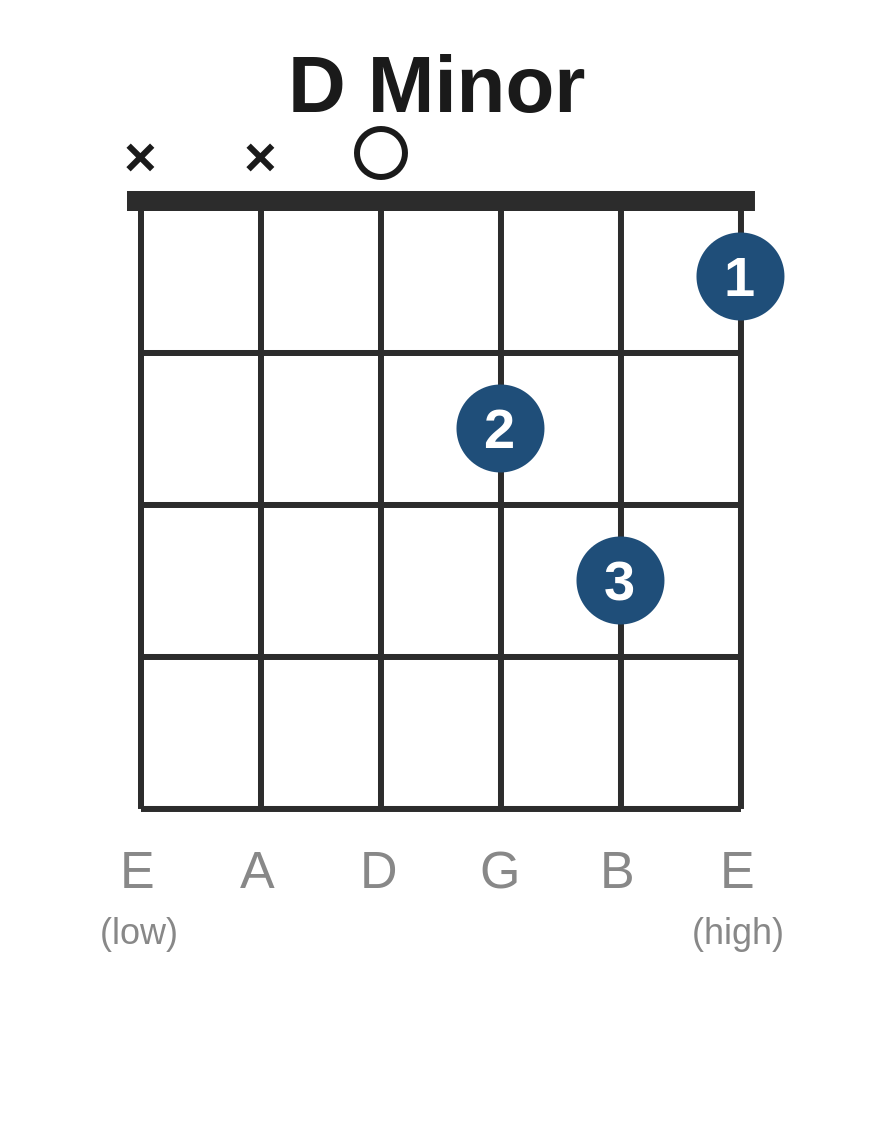
D minor has a reputation. Spinal Tap fans will tell you it’s “the saddest of all keys.” That’s a joke, but the chord does have a uniquely melancholy quality — somewhere between Em and Am in flavor, with a tighter, more focused sound.
How to play it:
- Place your index finger on the 1st fret of the high E string.
- Place your middle finger on the 2nd fret of the G string.
- Place your ring finger on the 3rd fret of the B string.
- Don’t play the low E or A strings. Strum the bottom four.
What to listen for: A clean, mournful sound, like a more serious version of D major. Each string should be clearly audible — Dm is unforgiving of muted strings.
Common mistake: Mixing up D and Dm. The shapes look similar, but the index finger sits on a different string in each. D major has the index on the G string; D minor has it on the high E. The middle and ring fingers also swap roles. Take the time to memorize them as separate shapes, not variations of each other.
7. C Major
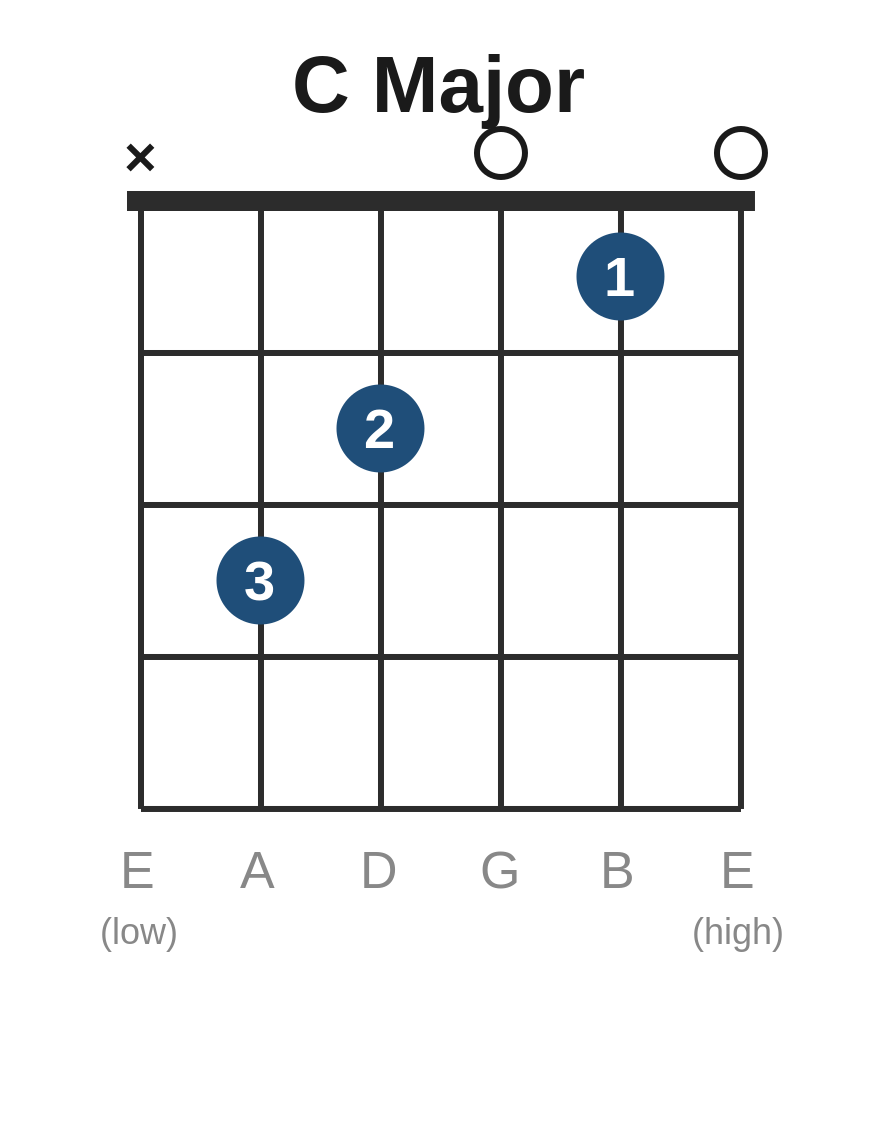
C major is the chord every guitarist eventually learns, and one of the trickiest of these eight. It involves a wider stretch and demands clean separation between three fretted notes and two open strings.
How to play it:
- Place your index finger on the 1st fret of the B string.
- Place your middle finger on the 2nd fret of the D string.
- Place your ring finger on the 3rd fret of the A string.
- Don’t play the low E. Strum from the A string down.
What to listen for: A warm, bright, complete sound. The open G and high E strings ring through the chord.
Common mistake: The ring finger is the one that gives most beginners trouble — it has to stretch back to the 3rd fret while the other two fingers stay in the first two frets. If your ring finger collapses or the A string sounds buzzy, you need to spend a few minutes a day on isolated finger-strength exercises. It will come.
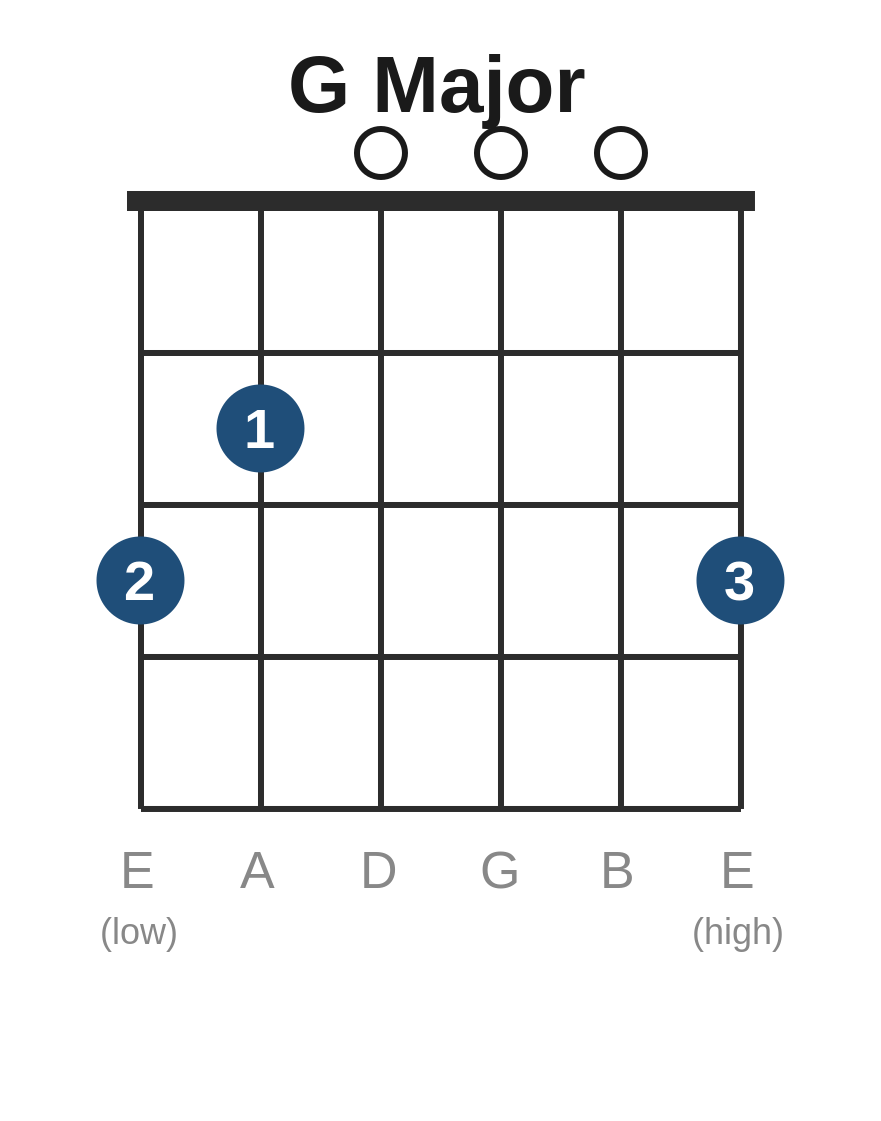
8. G Major
G major is the richest-sounding open chord on the guitar. All six strings ring out, the low E provides a deep root note, and the high B and E strings sing on top. It’s also the chord that finally gets your pinky involved on its alternative voicing — but for now we’ll use the three-finger version.
How to play it:
- Place your index finger on the 2nd fret of the A string.
- Place your middle finger on the 3rd fret of the low E string.
- Place your ring finger on the 3rd fret of the high E string.
- Strum all six strings.
What to listen for: A big, open, full sound. Every string contributes — the low E’s deep root, the open D and G in the middle, the open B, and the fretted high E ringing on top.
Common mistake: The middle finger reaching for the low E often pulls the index finger off the A string. Anchor the index finger first, then place the middle finger around it, then the ring finger. Some teachers prefer a four-finger version with the pinky on the high E — once your three-finger G is solid, try that variant. The four-finger version transitions to C major much more smoothly.
The Order I Recommend Practicing These
If you sat down with me for a lesson, here’s the practice sequence I’d give you for your first month:
Week 1: Em and Am
Just these two. Switch back and forth slowly. Don’t worry about strumming patterns yet — strum once per chord, slowly, and listen for clean notes. Five minutes, twice a day.
Week 2: Add D and E
Now you have four chords. Practice transitions: Em to D, Am to E, D to A. Switching is harder than fingering. The key skill of week 2 is moving between shapes without stopping the strum.
Week 3: Add A and Dm
Six chords. Now most country and folk songs are within reach. Try playing along to slow songs in keys you can handle.
Week 4: Add C and G
You now have all eight. The C-to-G transition is the hardest of the bunch — practice it specifically until it’s clean.
Two Progressions to Practice Tonight
A chord progression is just a sequence of chords played in order. Most popular songs use the same handful of progressions. Master these two and you can fake your way through hundreds of songs.
Progression 1: G — D — Em — C
This is the most common progression in popular music. It’s been used in everything from “Let It Be” to “No Woman, No Cry” to about half of country radio. Play each chord for four counts (one — two — three — four), then move to the next.
What you’re learning: The G-to-D switch and the Em-to-C switch are both common moves you’ll make in hundreds of songs. Get these clean and a huge amount of music opens up.
Progression 2: Am — F — C — G
Wait — F isn’t on this list. That’s intentional. F is the next chord I’d teach you, because it requires a small barre and deserves its own dedicated lesson. For tonight, substitute Dm for F. The progression becomes Am — Dm — C — G, which still sounds great and uses only chords from this page.
What you’re learning: Two minor chords in a row creates a more emotional, contemplative feel. This progression is the bones of countless slow ballads. Practice it slowly with even strumming.
Common Questions Beginners Ask About These Chords
How long should it take me to learn all eight?
Realistically, a month of daily 15-minute practice will get most adults to the point where you can play all eight cleanly and switch between any two of them. Faster if you practice longer; slower if you only pick up the guitar twice a week. Don’t measure yourself against teenagers on YouTube — they have hours a day and decades of catching up to do.
My fingers hurt. Is that normal?
Yes. The pads of your fingers will be sore for the first two to three weeks while your skin builds up calluses. This is completely normal, and the soreness fades fast. If you have actual joint pain (especially in the knuckles or wrist), that’s different — review your hand position, lower your shoulder, and consider whether you’re gripping too hard.
I keep buzzing on one string. What’s wrong?
Three common causes, in order of frequency: (1) you’re not pressing close enough to the fret bar — move your finger forward toward the metal fret, not back; (2) an adjacent finger is touching the buzzing string — arch your knuckles higher; (3) your guitar’s setup needs adjustment, with the strings sitting too high above the fretboard. The third cause is rare on a properly set up guitar but common on cheap instruments straight from a big-box store.
Should I use a pick or my fingers?
For learning chords, use a pick. A medium-thickness pick (around 0.73mm) gives you the cleanest, most consistent strumming sound and frees you to focus on your fretting hand. Fingerstyle is a separate skill worth learning later, but it adds complexity in a phase where your goal is to keep things simple.
What chord should I learn after these eight?
F major. It’s the next foundational chord and your first introduction to barre chords — the technique that will eventually let you play any major or minor chord anywhere on the neck. F is challenging, but it unlocks an enormous amount of music. We’ll cover it in a dedicated lesson.
What to Practice Next
Once these eight chords feel comfortable and you can switch between any two of them without long pauses, you’re ready for the next layer:
- Strumming patterns — these eight chords can sound dramatically different depending on how you strum. Down-down-up rhythms, syncopated patterns, and dynamic accents are the next layer of skill.
- Barre chords (starting with F) — once your three-finger chords feel solid, F major is the gateway to playing any chord anywhere on the neck.
- Chord progressions in different keys — the same progressions you practiced tonight, transposed to other keys, will train your ear to recognize song structures.
- Real songs — pick three songs you actually love that use only the chords on this page, and learn them all the way through. Nothing accelerates your playing like a song you genuinely want to hear yourself play.
The eight chords on this page are the foundation. Everything else in guitar — every advanced technique, every genre, every solo — is built on top of what you’re learning right now. Master them well. They’ll serve you for the next fifty years.